
Welcome to my devblog—this will be the first of many!
My plan for some of these devblogs is to show other developers how to implement certain aspects of a game in a practical way.
In this devblog we’ll dive into creating a pickup system for 2D games—think coins, health packs, or stamina boosts that make games more interactive and rewarding.
By the end of this tutorial, you’ll have a flexible system that spawns pickups, complete with visual polish like spawning animations and magnetic interactions.
Also, I’d like to mention that although this tutorial will be focused on Unity, it’s still possible to achieve the same results in other engines like Unreal.
To create a pickup system, you’ll need two scripts that splits the responsibilities. Here’s a quick visual on how it could work:

This separation follows the Single Responsibility Principle—a golden rule in game architecture.
If you already have your pickups, you can skip this section entirely. But at least make sure you have the right components attached, otherwise this system won’t work well.
Now, before we get into the nitty-gritty, you’ll need to prepare your pickup GameObjects. After all, you can’t make a cake without the right ingredients.
The number of pickups don’t matter, and you’ll most likely have varying types. But what matters most are the components each of those pickups must have:
| Component | Why? | Settings |
|---|---|---|
| Transform | Defines position/rotation/scale | (Automatic) |
| SpriteRenderer | Makes the pickup visible in-game | Assign your sprite |
| Collider2D | Allows detection when player touches pickup | Set to Trigger |
| Rigidbody2D | Allows physics movement for magnetic attraction | Gravity set to 0 |
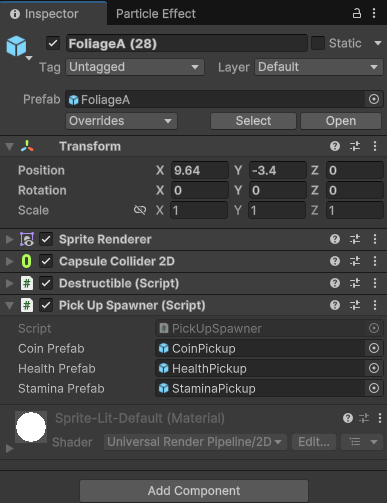
Make sure you turn those pickup GameObjects into prefabs so you can reference them in the PickupSpawner script!
The PickupSpawner script should be simple. You’ll only need to access your pickup prefabs and create the main logic for how you want those pickups to spawn.
To start, you’ll need references to the pickup prefabs you want to spawn in. It may look something like:
[SerializeField] private GameObject coinPrefab, healthPrefab, staminaPrefab;
You don’t have to add a [SerializeField] but in Unity it makes these variables editable in the Inspector
and makes life easier so much easier. Plus, if you’re working with game designers, they don’t have to touch a single line of code.
Now the drop logic depends on the design you’re going for. The spawner could either be random or determined.
In some cases, you’ll probably want certain objects to only drop certain items. Think of a design scenario where you want a skeleton with a sword to only drop that sword.
But to keep things interesting, you can add weighted randomness to determine what drops (or if nothing at all). Here’s a breakdown of how it could go:
| Roll | Outcome | Probability | Code Path |
|---|---|---|---|
| 1 | Coin | 20% | Instantiate(coinPrefab) |
| 2 | Health | 20% | Instantiate(healthPrefab) |
| 3 | Stamina | 20% | Instantiate(staminaPrefab) |
| 4 | Coin Burst | 20% | for-loop with random count |
| 5 | Nothing | 20% | Leave Out |
For that, you would define your range as:
int randomNum = Random.Range(1, 6);
This creates a 20% chance for each outcome (since 6 is exclusive).
If it lands on any number from 1-3, it’ll spawn one of those pickups:
if (randomNum == 1) Instantiate(coinPrefab, transform.position, Quaternion.identity);
if (randomNum == 2) Instantiate(healthPrefab, transform.position, Quaternion.identity);
if (randomNum == 3) Instantiate(staminaPrefab, transform.position, Quaternion.identity);
A neat trick you could also do is randomize the amount. In this case, if it lands on 4, it’ll spawn in a coin burst with a randomized amount:
if (randomNum == 4)
{
    int randomAmountOfCoins = Random.Range(1, 4);
    for (int i = 0; i < randomAmountOfCoins; i++)
    {
        Instantiate(coinPrefab, transform.position, Quaternion.identity);
    }
}
For all you switch-statement-lovers out there, you could simply have:
switch (roll)
{
    case 1: Instantiate(coinPrefab, transform.position, Quaternion.identity); break;
    case 2: Instantiate(healthPrefab, transform.position, Quaternion.identity); break;
    case 3: Instantiate(staminaPrefab, transform.position, Quaternion.identity); break;
    case 4:
        int randomAmountOfCoins = Random.Range(1, 4);
        for (int i = 0; i < randomAmountOfCoins; i++)
        {
            Instantiate(coinPrefab, transform.position, Quaternion.identity);
        }
    break;
}
Regardless, of which you choose, put all that logic inside your method—I called my DropItems(). Here’s a preview of the drop chances:

Now you might be asking where would you call this method? You could call it when the player kills an enemy or when they open a chest (really during any player interaction).
For example, I made a Destructible script where I attached it to objects like bushes. When the player shoots at it, the bush game object will be destroyed. But just before it gets destroyed, I call the method:
public class Destructible : MonoBehaviour
{
    private void OnTriggerEnter2D(Collider2D other)
    {
        if (other.gameObject.GetComponent<DamageSource>())
        {
            // called here
            GetComponent<PickUpSpawner>().DropItems();

            Destroy(gameObject);
        }
    }
}
Don’t forget to attach your PickupSpawner script into game objects where you want pickups to spawn from. And most importantly, reference your pickup game objects!
As for the Pickup script, it requires a little more finesse.
Remember this will handle how the pickups will interact with the player. After being called from the PickupSpawner, you’ll need a way to move the pickup to the player. You just need to figure out the main logic for the interaction and behavior, and the variables to define those movements.
To move your pickups, you’ll need a variable for the distance the player needs to be in order to pick up that item. Then, define the movement direction (or target) of where the pickup will go, the speed, and acceleration rate. You’ll also need the pickup item’s Rigidbody2D component since we’re dealing with physics. You could have:
[SerializeField] private float pickUpDistance = 5.0f;
[SerializeField] private float moveSpeed = 3.0f;
[SerializeField] private Vector3 moveDirection;
[SerializeField] private float accelerationRate = 0.4f;

private Rigidbody2D rigidBody;
You don’t necessarily need acceleration, but it makes pickups start slow and speed up—like a magnet pulling stronger as it gets closer. Remove it if you prefer consistent speeds.
For the main Update() method, this is where you’ll put the main logic for moving the pickup towards the player.
That means we gotta find and define the player’s position. Then, you compare the variable using the Distance function,
making sure it’s less than the pickup distance. If so, the movement direction or target will be where the player position
is (make sure its normalized for consistency). Then add the pickup move speed with the acceleration rate:
Vector3 playerPos = PlayerController.Instance.transform.position;

if (Vector3.Distance(transform.position, playerPos) < pickUpDistance)
{
    moveDirection = (playerPos - transform.position).normalized;
    moveSpeed += accelerationRate;
}
Since we’re dealing with physics in Unity, you’ll need to add in a FixedUpdate() method and grab the
pickup’s RigidBody2D component. Make sure to grab that component in your main Awake() method as well.
Then, in the FixedUpdate() method you’ll need to move that rigidbody using the linearVelocity function based on the pickup’s movement direction, speed, and by delta time:
private void FixedUpdate()
{
    rigidBody.linearVelocity = moveDirection * moveSpeed * Time.deltaTime;
}
Again, since we’re attaching this to game objects, you’ll need to make use of OnTriggerEnter2D(). We’ll use this to
define how the pickup will react to the player when they get too close. In most cases, we destroy them to mimic them
being ‘picked up’ by the player.
You’ll just need a way to verify that it’s the player by either using a tag or a player controller component. Something like:
private void OnTriggerEnter2D(Collider2D other)
{
    if (other.gameObject.GetComponent<PlayerController>())
    {
        Destroy(gameObject);
    }
}
If you haven’t already, you can go and test out both your scripts to make sure they’re both working correctly. When interacting with the pickup spawner object, they should spawn in your pickup items in the same location. If everything looks in order, we can continue to add more details and behavioral functions for different types of pickups.
Since our pickup items can be different types, we’ll need a way to easily manage them and have them behave accordingly. This is where enumerators come in.
For my implementation, I only had 3 types. But you can easily add more to fit your game’s needs. A helpful tip is serializing the pickup type and in the Inspector, you’ll have a neat dropdown to easily define its type:
private enum PickUpTypes
{
    Coin,
    Health,
    Stamina
}

[SerializeField] private PickUpTypes pickUpType;
Now another main part of the logic for this script is figuring out how pickups should behave when they are triggered.
This is why I recommend you define different pickup types in an enumerator. We can use an if-statement (or switch) and make it do something.
Now this will also entirely depend on how your current systems are. For example, for coin pickups, you could have an EconomyManager that knows how to handle adding coins. For health, you could access the player’s health system and have a method that heals the player to full HP. For stamina pickups, you might have a stamina component that deals with restoring the player’s stamina pool.
Regardless, you would define how those behaviors go, but call them inside your switch or if-statements. It might look like this:
switch (pickUpType)
{
    case PickUpTypes.Coin:
        EconomyManager.Instance.UpdateCurrentCoin();
        break;

    case PickUpTypes.Health:
        PlayerHealth.Instance.HealPlayer();
        break;

    case PickUpTypes.Stamina:
        Stamina.Instance.RestoreStamina();
        break;
}
You would then go back to your main trigger logic and call this method in there before destroying the pickup:
private void OnTriggerEnter2D(Collider2D other)
{
    if (other.gameObject.GetComponent<PlayerController>())
    {
        // called here
        DetectPickupType();

        Destroy(gameObject);
    }
}
For some visual polish, instead of just instantly spawning a pickup when it is called from the PickupSpawner, it’s always a good to add details like animations. I’ll show you how to add a ‘popping’ like effect where the pickup spawns out with an arc.
Here’s a preview of that:
First you’ll need access to Unity’s AnimationCurve and reference that. Then, you’ll need to define how high the
pickup will go and curve, and then how long it’ll last.
[SerializeField] private AnimationCurve animationCurve;
[SerializeField] private float heightY = 1.5f;
[SerializeField] private float popDuration = 1.0f;
Since this animation curve is going to be in a sequence, it’s best if you call it in a coroutine. In an IEnumerator,
you’ll need to define the starting and end points. To make the pickup spawn randomly and curve between left or right,
we can define the endpoint with random offsets using Random.Range():
Vector2 startPoint = transform.position;
float randomX = transform.position.x + Random.Range(-2.0f, 2.0f);
float randomY = transform.position.y + Random.Range(-1.0f, 1.0f);
Vector2 endPoint = new Vector2(randomX, randomY);
Then in a while loop, define a starting time and make sure it’s less than the duration. Inside the loop, you’ll need to define the linear progression of the animation curve and the max arc height (the apex height).
while (timePassed < popDuration)
{
    timePassed += Time.deltaTime;
    float linearT = timePassed / popDuration;
    float heightT = animationCurve.Evaluate(linearT);
    float height = Mathf.Lerp(0.0f, heightY, heightT);

    yield return null;
}
To get the horizontal movement down, we use the two points (starting and ending) and smoothly move using our defined linearT:
transform.position = Vector2.Lerp(startPoint, endPoint, linearT) + new Vector2(0.0f, height);
Now don’t forget to set up the animation curve in the Inspector. You could set up your animation curve in any way you see fit to match your designs. But I recommend a downwards parabola:

The whole routine should look something like so:
Vector2 startPoint = transform.position;

float randomX = transform.position.x + Random.Range(-2.0f, 2.0f);
float randomY = transform.position.y + Random.Range(-1.0f, 1.0f);
Vector2 endPoint = new Vector2(randomX, randomY);

float timePassed = 0.0f;

while (timePassed < popDuration)
{
    timePassed += Time.deltaTime;
    float linearT = timePassed / popDuration;
    float heightT = animationCurve.Evaluate(linearT);
    float height = Mathf.Lerp(0.0f, heightY, heightT);

    transform.position = Vector2.Lerp(startPoint, endPoint, linearT) + new Vector2(0.0f, height);
    yield return null;
}
Don’t forget to call this coroutine in your script’s main Start() method:
private void Start()
{
    StartCoroutine(AnimationCurveSpawnRoutine());
}
Now go test out your pickup script! If you want a similar look as the one above, here are the settings I did:

Give yourself a pat on the back because you just created a handy pickup system. As you can see, it’s a small yet modular system where you can design it to fit your needs.
Here’s both of the scripts if something isn’t working as expected (I completely understand your pain) or you can download the zip here.